Wednesday, November 2, 2011

Khoresh Karafs (Persian Celery Stew)


It's a been a while since my last post.  I'm so sorry!! October was randomly a busy month for me and "the household."  Well, I'm here now and I'm so excited to start this post with one of my favorite Persian stews--Celery Stew (Khoresh Karafs).
Usually when I pass by the celery in the vegetable section, I'm always tempted to just pick off 2-3 ribs-- which is all I ever need.  I never need the whole stalk and usually discard half of it because it goes limp in the "vegetable crisper drawer".   
Celery has never really been given credit as the main ingredient of any dish except for this recipe that I'm about to share with you.  Warning: if you are not a fan of celery's crisp, sour, herbaceous wonderfulness then this recipe is not for you.
Warning #2: I've also been told that celery is an aphrodisiac.  Another reason to give celery a try!  
There are two ways of making this stew.  This is my favorite version which incorporates the use of tomato paste and chicken thighs.
Serves 4-6
Ingredients:
(2) Stalks celery, preferably organic, cut at the base
(1) pound boneless, skin-less chicken thighs, or breast, cut into cubes
(2) bunches Italian parsley
(1) bunch cilantro
(1) medium yellow onion, diced
(1) can tomato paste
(1) teaspoon turmeric  
(1) lime, juiced
(1-2) teaspoons cayenne pepper (optional, but if you like spicy food ADD IT)
S/P to taste

1. Wash every rib of celery individually and set aside.
2. Triple wash the parsley and cilantro.  Making sure it is free of sand. Set aside. The best method for doing this is rinsing it once.  Letting it soak in a bowl of water until all the sand goes to the bottom.  Gently removing the herb from the bowl of water and rinsing it again in a colander.
3. Chop the celery into 1/4"-1/2" thickness.  Include the leaves. 


Finely chop the cilantro and the parsley.  It must be done by hand using a sharp knife.  Do not be tempted to run it in your food processor as it will not chop evenly and will turn out mushy when cooked.  
(This is a lesson I learned from my mom as I've been her right hand "wo-man" in the kitchen growing up and I always watched her chopping everything by hand for Persian stews.  I'd tease her saying it'd be much easier/faster in the food processor and then she'd go on telling me it must be done by hand and that if you're inviting other Persians to your home they will know the difference and "scoff" at your Persian stew making if you use the food processor.) I have yet to make any Persian stew for my Persian friends/family--I don't want to be "scoffed" at.  Anyway...

In a large pot heat a tablespoon of oil.  Saute the chopped parsley and cilantro for 2 minutes.  Add the celery and saute for 4-5 minutes.  Pour the contents into a heat proof bowl and set aside.


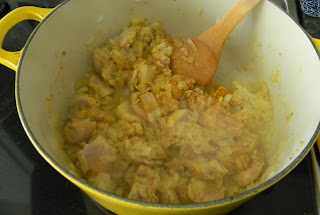
In the same pot, heat another tablespoon of oil and saute the diced onion for 2-3 minutes.  Add the cubed chicken and saute for 4-5 minutes.  At this point add all your other seasonings: turmeric, tomato paste, lime juice s/p, and the optional cayenne.
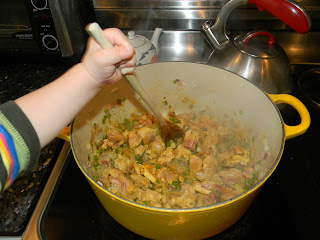

 Pour the reserved celery, and herbs back into the pot.  Give it a good stir.  As you see in the picture above, I have a little kitchen gnome that helps me with the stirring.  Add about 2 cups of filtered water or chicken stock and bring to a boil for 10 minutes. 


Reduce to a simmer, cover and cook for 2-3 hours on low heat.  Check it every now and then with a good stir.  You'll know the stew is ready once all the ingredients have "settled" together.


Serve it with steamed saffron basmati rice and "tahdiq" (a.k.a. the rice on the bottom of the pot that is crispy)


This is a great fall/winter stew.  It can even be enjoyed on its own or with crusty bread.
Nousheh jan!


Vegan option: The omission of chicken in this stew makes it vegan.  You can substitute your protein by using firm tofu that can withstand the process of "stewing" or adding a can of garbanzo beans and kidney beans.

Thursday, September 22, 2011

The Perfect "meat~n~ potatoes" Sandwich


~Persian Kotlet Sandwich~

Which came first? The Persian Kotlet made with ground beef and grated potatoes or the Polish Kotlet made with pork that has been pounded thin then dredged in seasoned flour? 
I'm not exactly sure and I really don't care.   I do know this, Persian Kotlet was the staple "go-to" sandwich when we'd go on picnics and road trips growing up.  
I was feeling nostalgic the other day.  Reminiscing my move to Arizona after college.  Leaving behind my childhood and early adulthood in Arkansas, all for a new beginning.  I will never forget the long road trip ahead of me: My little black Civic packed to the brim of some of my belongings, my dad driving--eager to get on the road, as he loves road trips and myself feeling bittersweet about this big change as I wave good-bye to my mom early in the morning.
We had close to 2 full days ahead of us with plans of only stopping for gas.  The night before my mom prepared our lunch/dinner to last us the two days we would be on the road.  Persian Kotlet was on the menu for our road trip.  I laugh as I type this because I remember sitting in the passenger side making my dad a sandwich and hoping not to spill anything in my new car--I somehow maneuvered stuffing the pita with a kotlet, tomatoes, onions, cilantro, parsley, spicy pickles and squeezing lime juice all while my dad was driving.  
I can now put "sandwich maker in a moving car" on my resume--it takes some serious skills to make a sandwich in a car.
By the second day, we were pretty bored with eating the same sandwich, but we had a long day ahead of us and we did not want to stop for food.  We were out of vegetables by the second day so I improvised by using ketchup packets my mom had put in the cooler.  It definitely lacked the vegetables, but it was still tasty with ketchup.  By the time we got to Flagstaff, AZ from New Mexico, we treated our selves to a little quant restaurant and joked how we will NOT be eating kotlet for months to come.

Well, I have had my fair share of this delicious picnic/potluck/road trip sandwich, although I have never made it.  So when I called my sister Mahsa for the recipe, (She has my mom's recipe), I was very excited to make it.  I almost felt like I should go into my little black Civic and eat it like I had with my dad.

This recipe is our family recipe.  Some Persian families cook the potatoes first, run it through a rice mill and then mix it with the ground beef before pan frying.  We grate the potato raw, mix it with the ground beef and then pan fry.  It literally comes out looking and tasting like hash browns, but with meat in it.  Crispy on the outside and soft inside.

Also, the meat to potato ratio is 1:1, however, I like the way my sister uses more potato and just a little bit of meat. This recipe is more like a 5:1.

~Persian Kotlet~
makes 24

5 pounds Russet potatoes, peeled and grated
1 pound of organic ground beef
1 medium onion, grated
1 egg, lightly beaten
3 tablespoons turmeric
1/4 canola oil
S/P


Grate the potatoes in a food processor with the grater attachment.  Place the potatoes in a big bowl.
Work fast as the potatoes will oxidize on you.  I squeezed (1) whole lime and tossed it to buy me some time.  You will notice that the potatoes will give out some water.  Working in batches, place some of the grated potato in a cheese cloth or kitchen towel and wring out until most of the water is drained.  Continue doing so for the entire batch
In a separate bowl mix the beef with the egg, turmeric and s/p.
Once the potatoes have all been drained of their liquid, add the grated onion to the mix with s/p.  Then add the seasoned beef to the grated potato and onion mixture.  Since there is more potato than beef, it will take a while to mix by hand, but it will all get incorporated.
Then form into oval shaped patties--this part is important that it is oval and not round.  Place them on a sheet tray. About 8 will fit on the sheet tray, cover with plastic wrap, and continue piling on top of each other--they won't stick since you are covering each layer with plastic wrap.
Refrigerate for at least an hour to set.
Prepare a medium sized skillet filled with 1/4 cup oil and heat on medium high
Gently place the kotlet in the pan.  You may need to use a splatter guard to prevent getting splashed with oil--I still got splashed though.
Pan fry until golden on both sides. I flipped the kotlets 2-3 times during the pan-frying process to get an even golden color to them.
Drain them on a rack over paper towels and a sheet pan.  Sprinkle with a little sea salt just when you take them out while they are still hot.

Assemble the kotlet in a pita pocket or your favorite bread.  I topped mine with diced, onions, tomatoes, chopped parsley/cilantro, pickles and squeezed lots of lime on it.

Enjoy!  
I know I did and I didn't have to worry about getting my car dirty this time.

Wednesday, September 14, 2011

Sauvignon Blanc Roast Chicken with "end of the season" vegetables


My inspiration to make this dish came from my favorite grocery store SPROUTS Farmer's Market.  It's a local market that started back in 2002 and has now expanded to CA, CO and TX.  They have a great meat department with friendly butchers.  Sprouts is the only place I trust their ground meat since they grind it in house and if you're nice to them they'll grind to order--which I do.  Also, the other stores I go to (warehouse stores and "name-brand" super markets) get their ground meat in already ground--they just run it through the grinder to make it look fresher--trust me, I asked the butcher at those stores and they told me). Another great thing is that their chicken is all natural with no chemical enhancer, sodium based solutions, or growth hormones and stimulants.  I take my meat seriously when I'm feeding my friends and family!
I am also tempted to buy fruits and vegetables by the pounds there because they're not only inviting with their sweet fragrance, but it is the only store in my valley with affordable prices.  I usually stop my temptations of over hoarding by reminding my self  it's only the 3 of us and I have no plans of having an army over for lunch or dinner. 
Ok, so maybe my inspiration to make this particular lunch is as a result of my over hoarding of affordable, market fresh vegetables.  Earlier in the week I had bought a few pounds of tomatoes for .67 cents/pound, 3 RED bell peppers for $1(can't beat that!), couple pounds of perfect summer zucchini for .88 cents/pound, celery stalk for.88 cents, eggplant for $1, a pound of organic carrots for $1 (don't get me started on fruit...) get my drift? 
Because of my addiction for over buying affordable vegetables, today I had to try to come up with recipes to use them before they went bad and this is what was for lunch thanks to Sprouts:

Sauvignon Blanc Roast Chicken with "end of the season" vegetables:

For the chicken:
(1) whole chicken about 6 pounds, washed and pat dry
2 ribs of celery, cut in thirds-then halved
2 carrots, cut in thirds-then halved
1/4 red onion chopped 
Seasoning:
Salt/Pepper
teaspoon of paprika, chili flakes, angelica powder, dried ginger
Fresh seasoning:
tablespoon chopped fresh parsely, mint, and 3 cloves garlic

Pre-heat oven to 420 degrees:


In a heavy-duty skillet (cast iron or roasting pan) pour a tablespoon of oil (I use grape seed oil), then place the vegetables on the bottom of the pan.  Sprinkle with S/P.
The vegetables have 2 functions: they'll keep your chicken from sticking to the pan, and they'll add flavor to the broth produced while roasting as you baste.


Rub the chicken with dry/fresh seasoning inside the cavity, under the skin (gently pull back the skin as you do this), and over the skin.  Truss your chicken with kitchen twine, place it in the pan on top of the vegetables and rub it with a teaspoon of oil.


Cover the chicken in 2 layers of cheese cloth that has been dipped in about 1/4 cup of white wine--I used sauvignon blanc for its crisp, stone fruit taste.  Using cheese cloth (as I learned from Martha Stewart's Thanksgiving edition back in the day) will keep your chicken from drying out while it's roasting. 


 On the stove top, prepare a bath of equal parts wine and chicken stock (1 cup each) with half a stick of butter, and fresh parsley and celery.  Keep it on medium-low heat, and use this liquid to baste the chicken every 15 minutes or so.

Roast the chicken for about 20 minutes at 420 (convection) and then bring it down to 350-375 for the remainder of the time while you continuously baste the chicken


For the roasted vegetables you will need:

3 Roma tomatoes, cut in half
1 Red onion chopped
2 zucchini's cut in half, then chopped
2 red peppers, membrane and seeds removed, chopped
1/2 medium eggplant, chopped 1/4" thick
1 garlic bulb cut in half

Place in big bowl, drizzle with olive oil and toss with salt and pepper.  Place it in a sheet pan and roast for 30-40 minutes or until roasted.


The chicken is roasting, continuously basted, and protected from drying out by the cheese cloth.


Once the chicken is cooked, juices run clear and thermometer reads 180 degrees in the thigh, remove it from the oven.  Take the cheese cloth off and let it rest.  When I did this, the breasts were not as brown as I like it to be, so I placed it under the broiler at 550 for 5 minutes and it came out crispier than you see in the above photo.


Serve the finished result on a platter, with the chicken cut in quarters.
This lunch for 2.5 cost me $8 with left overs for dinner!
Thanks Sprouts!
Did I mention this lunch was also gluten-free?...

Saturday, September 10, 2011

Under construction

My blog is under construction...trying to find a layout that best works.  Please give me suggestions and ideas!!! Would love to hear them.
Thanks,
Mahfam

Thursday, September 8, 2011

It's taco Tuesday, except today isn't Tuesday!


Here's to all you taco lovers out there!
  
By now you have probably realized how obsessed I am with tacos.  I'm not talking about Taco Bell tacos either--except I have had my fair share of that place when in college.  I'm talking about home-made tacos.  The kind that has your special touch to it.  The kind where you can put anything and omit anything you'd like in it. And, the kind that when you've finished preparing all the toppings/fillings you can sit down and enjoy 2, or 3 or 7 tacos without feeling guilty of who's counting--because you're at home and who cares if you just ate the 7th taco, you made it, it's healthy. Be proud of your taco!

What I like about tacos is that they're versatile. You can seriously put any "country" into a taco.  So like my other taco recipes here and here that I've blogged about, this one is another version with similar spices, except I've also added a Chilean technique in braising the meat.  
Did I mention my husband is Chilean? Oh, I didn't? Well, my husband is Chilean-actually his parents are from Chile-he was born in the States.  So when I met his wonderful family for the first time while we were dating, I was intrigued by all the delicious foods his mom would make for us.  One such dish called Carne Mechada is my favorite.  It's made by braising beef in red wine and aromatic vegetables until it's tender and flavorful.  
So my inspiration for making these tacos are from both cultures.  Hmmm, maybe I should call it the Rumi taco--hey, he is both Chilean and Persian.

Okay, so here's what you need for the "Rumi Taco"

Serves 2 (maybe 1)
1/2 pound to 1 pound bone-less leg of lamb steak (it's what I used, you can use any cut of beef, chicken, or lamb)
Spices: 1 teaspoon turmeric, paprika, cumin, dried mint, dried dill, salt/pepper
2 carrots roughly chopped
2 ribs celery roughly chopped
1 medium white onion roughly chopped
2 clove garlic, crushed whole
1 Persian dried lime found at specialty food markets (optional)
4-6 oz. red wine (I used a Chilean wine of course-Carmenere is the grape synonymous to Chilean wines)


Rub the spices all over.

 In a heated pot with 1 tablespoon oil (I've been using grape seed oil lately), sear all sides of the meat. Then remove the meat to saute the vegetables.
 All your aromatic vegetables should be sauteed for about 3 minutes. Don't care about having evenly cut vegetables since you will discard them later.
 Deglaze with the wine, scraping the bottom of the pan with a wooden spoon. Submerge the meat back into the pot, placing some vegetables on top.
 Cover, bring to a boil for 10 minutes, then simmer for 3 hours until the meat is fork tender and juicy.
Then remove the meat. Strain the vegetables in a colander and reserve the juice.
Cut the meat in small cubes or shred. Place in a shallow bowl and pour the reserved juice over it.
 My personal taco bar: Persian "salsa": cucumbers, cilantro, red onion, tomatoes tossed in minted-citrus vinaigrette.
Sheep's Milk Feta cheese, Shaved radishes, and garlic-yogurt.
 Warm your corn (or flour) tortillas in a hot skillet w/o oil until toasted, yet pliable and assemble your taco the way you like it.
Eat it like no one's watching! Except I purposely posed for this picture because I knew you'd be watching. Afterwards, I ate like a pig :)

Thursday, September 1, 2011

Okra Stew for the Patient Cook


I have never been good with patience.  Ask my family, they'll tell you.  Ask my husband, HE. WILL. TELL. YOU.  
I hate waiting on things to happen. I like quick results-FAST.
I avoid long lines.
If I buy a new outfit, I will wear it the very same day--even if it's too hot/cold to wear.
If it's your birthday next week and I already have a gift for you, chances are I will give the gift to you today.  (Ask Cristobal)
Sorry, but if you're talking I sometimes have a bad habit of finishing your sentence (or assuming I know what you're going to say).
I even read the last page of a book sometimes just to see if I'm going to like the ending--during the middle of the book. (don't do it much now)

So you see, I'm not very patient.  I'm getting better at it. Thanks to having a baby! (I must have skimmed through the baby books on the part about being patient when having a baby-didn't get the memo)
Rumi has slowed me down a bit--ok, a lot--so much so that my family has noticed it.  
It's not longer about ME and my time.  
Rumi has helped me to appreciate life as it happens.
I go with the flow--sometimes a little too much.
I meditate.
I breathe.
I learn by watching him take in life.

So when I came across FRESH okra at the grocery store yesterday, I knew I had to make one of my favorite Persian stews my mom would make for us...I vividly remember watching the pot simmer in my mom's kitchen, just waiting for her to give me the 'go' to taste test before adding more salt or lemon juice...
Standing at the produce section with Rumi in the cart, I was picking out the okra while letting Rumi play with one in his hand.  I loved his curiosity for this new thing in his hand. 
He smelled it. Looked at me for acceptance.
He chewed on it while making funny faces.
He even licked it, only to throw it back at me, as if I had given him something bad.
So I told him I will make him Okra stew, but that he would have to be patient.
In reality, I was telling myself I need to be patient.
As with any Persian stew, PATIENCE is the key ingredient--even my mom told me to be patient when I called her this morning for the recipe!

It's very simple, the hard part is waiting for it to "settle" before you eat it.

Ingredients:
1-2 pounds stew meat (beef or chicken-boneless,skinless), cubed
2 medium onions diced
1 pound fresh okra or frozen-remove the stems if using fresh
1 red bell pepper, chopped
2 roma tomatoes
3 Persian dried limes, (substitute juice of 2 limes or lemons...or to taste)
1 can tomato paste
1 teaspoon turmeric
S/P/oil


Persian dried limes are a key ingredient to most if not all of Persian stews.  It adds a punch of tanginess.  Treat it like you would a bay leaf--remove before serving.  If you eat it you will pucker your lips until tomorrow-although, I like it :)
Heat a dutch oven, or heavy duty pot with some canola oil on medium high heat.  Sautee onions. Add the chicken and saute with salt, pepper and turmeric. About 10 minutes. Add 1/4 cup of water, cover.
Meanwhile, in a skillet saute the okra in batches just until lightly browned. (make sure the okra is fully dry at this point) Turning once or twice. (skip this part if using frozen okra)
Add the sauteed okra to the pot with the simmering chicken. Gently stir.
Next add the bell peppers, tomatoes, and dried limes.  Add the tomato paste and dilute with about 2 cups water. Gently stir. Bring to a boil and simmer for 3 hours. 
Be sure to remove the skin from the tomato 20 minutes into cooking and then use your wooden spoon to mash the tomatoes into the sauce.
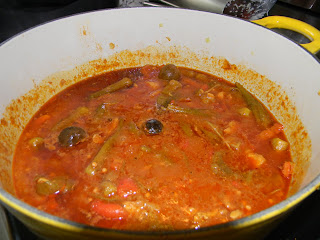
After 3 hours, it should look like this. "Settled" as my mom would say.  All the flavors have combined. The okra has taken in all the flavors from the meat, limes, and tomatoes.
Serve this stew like all Persian stews along side a plate of steaming, saffron-basmati rice.

This is gluten-free and can be vegan if you omit meat.  Just use vegetable stock instead of water to give it body and extra flavor.

Hey, if I was patient enough to make this for lunch. You can make this!! Another great recipe for your Crock-Pot too--you know it's collecting dust in your closet, so give it a try :)

Wednesday, August 31, 2011

Blueberry and Cardamom Yogurt Cake


I'm turning into my mom!!!!

Wait, does this mean that one day <if> I have a daughter, she'll gasp and think the same thing too?!  Okay, I will quickly remind myself it's not a bad thing at all.  In fact, it's great, because my mom's cooking and her teaching are always an inspiration to me. 

Anyways, I'm turning into my mom because I'm adding all things "Persian" to any recipe I come across these days--especially desserts.
As noted in one of my previous blogs about strawberry cake, I noted how I practically despised anything that involved cardamom, rosewater, whatever "Persian" that my mom added to desserts when I was a kid.

Well I'm all grown up now. And here I am, adding those pesky ingredients to a recipe I recently came across in the June 2009 issue of Gourmet magazine. It's called Raspberry Buttermilk Cake. 
I took out the buttermilk, sub'ed Strauss Organic Yogurt and added 1/4 a teaspoon of ground cardamom. Oh and I used blueberries instead of raspberries. Raspberries freak me out sometimes...they're fuzzy and the little seeds get stuck in my teeth.

It's best to use Strauss Organic Yogurt for this recipe because that tangy taste that I love about that yogurt really comes out in this cake.  Also, when you add a couple of dashes of ground cardamom to this recipe, it really pairs well with a hot cup of Persian tea (Earl Grey or Darjeeling is just fine).

Recipe for (1) 9'' round cake (I made two in the photos):

1 cup all-purpose flour
1/2 tsp baking powder
1/2 tsp baking soda
1/4 tsp cardamom
1/4 tsp salt
1/2 stick of unsalted butter, softened
2/3 cup plus 1 1/2 Tbsp. sugar, divided
1/2 tsp pure vanilla extract
1 large egg (preferably free-range)
1/2 cup of Strauss Organic Yogurt (or buttermilk)
1 cup fresh blueberries

Pre-heat oven to 400 with rack in the middle. Butter and flour a 9" round cake pan.
Whisk together first 5 ingredients and set aside.


Cream butter and 2/3 cup sugar with an electric mixer at medium-high until pale and fluffy, then beat in vanilla. Add egg and beat well.
At low speed, mix in flour mixture in 3 batches, alternating with yogurt, beginning and ending with flour, and mixing until well combined.
Floured pan--I like to use cornmeal on the bottom of my pans.
Spoon batter into cake pan, smoothing top. Scatter the blueberries evenly on top and sprinkle with remaining 1 1/2 tbsp. sugar. (remember this recipe is for one cake pan, I doubled it to fill 2 pans)
*my added "touch": lick the bowl and spatula while you're waiting for the cake to bake
Bake for 25-30 minutes or until a toothpick comes out clean. Cool in the pan for 10 minutes then turn out onto a rack and cool to warm 10-15 minutes more. Invert onto a plate.


This is the best afternoon dessert! Thanks to my old issue of Gourmet magazine and my mom's wisdom of adding and sub'ing random Persian ingredients!  


Wednesday, August 17, 2011

Braised Brisket with Southwestern Spices

I have a HUGE crush on Southwestern cuisine.  I think of cowboys and campfires, lassos and horses--an open field with roaming cattle.  I like to picture a big cast iron pot on an open flame, simmering with meat along side vegetables and beans--and a hungry cowboy waiting patiently for his meal after a long day.

Typically known for food that has been influenced by our wonderful neighbor Mexico, Southwestern cuisine involves the use of chiles, spices, and braised meat.  Instead of using cuts of meat like the head, ears, or feet in these braises that's typical in Mexico, Southwestern cuisine revolves around larger cuts of meat such as beef brisket or pork butt/shoulder.  
I made this recipe of braised brisket in honor of Rumi's 1st birthday.  A true "cowboy" sort of meal for friends and family.  The spread was turned into a taco bar with home made salsas (roasted tomatillo and spicy cilantro-onion), home made pickled carrots and onions, lots of cilantro and limes and a strawberry cake topped with a #1 candle for many wishes to come true.

For 8 pounds of Brisket (about 3 cuts) you will need:
A head of celery (roughly chopped)
2 onions roughly chopped
1 pound of carrots roughly chopped
1 red bell pepper roughly chopped
1 green bell pepper roughly chopped
1 lime, sliced in half
1 serrano
2 dried pasilla peppers
1 bulb of garlic (whole, not peeled)
1 bottle of beer (preferably Modelo negra, but I had an IPA on hand) *you can substitute beef broth or just water.
1 can of tomato paste
3 chipotle peppers from a can


For the Rub:
1 1/2 tablespoon New Mexico Chili powder
1 tablespoon Paprika
1 1/2 tablespoon Cumin
2 tablespoons Salt
A few turns of fresh cracked pepper


Rub these spices all over the brisket and let it marinate overnight or for at least 2 hours.


Heat 2 tablespoons of oil in a pan (preferably the pot you will be braising in, but a pan will do if you plan on putting it in the slow cooker) and sear both sides of the brisket starting with the side with a slab of fat on it.  And don't feel obligated to remove that fat as it adds body and flavor to the braise.  


Next:
Sautee all the vegetables in small batches for 2 minutes.  During your last batch, add the tomato paste and chipotle peppers and mix it in.  Deglaze with the beer and then add the meat and vegetables in layers into your pot.


Cover with a little more water if necessary.  About mid-way in the pot. Cover and braise in the oven for at least 6 hours at 275 degrees. Or until the meat is tender and falls apart.
It should look like this when it is ready to be cut into shredded pieces.
Using tongs, gently place the meat on a clean sheet pan.  Toss all the other veggies (or snack on them as I did).
SAVE THE LIQUID!!!
On medium high heat, reduce the liquid by half and add a little honey to it (optional).  The honey adds a touch of sweetness to the spicy sauce.  
On a clean cutting board, remove the fat on the under side and cut the meat into small shredded cubes.  Pour most of the reserved juices that have been reduced on top.
And here it is: braised brisket with Southwestern spices.
Eat it as taco meat, burrito meat, "sloppy joe", layered into nachos, served with rice and beans or jalapeno corn bread. Just remember to eat it like a COWBOY :)